This blog post details the workflow that I use to post most of our blog posts that have GPS data and Images. I hope these steps are easy to follow and are useful. Not all steps are necessary and there are many different ways to do similar things, but this is how it usually works for me.
0. Before you go out


5. Creating the Blog Post
Elevation Gain - XXX ft
Difficulty - Easy Moderate Hard Crazy Hard
Time - X:XX
Description - Enter description
Photos - Picasa Web Album
http://briangbrown.googlepages.com/album_background_black.gif

0. Before you go out
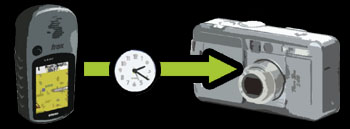
- The two things I use to make these posts are a digital camera and a GPS receiver that allow you to upload their data to a computer. (I am currently using a Garmin etrex Legend Cx and a Canon PowerShot S40)
- Sync the time of your digital camera to the time on your GPS. And when I say sync, I mean sync to the second. This will help a great deal later on when geotagging.
- Setup your GPS to create tracks whenever your GPS receiver is on. This was the default setup of the Garmin I use.
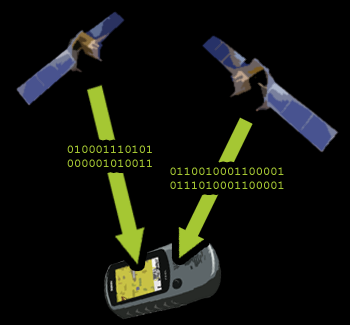
- Turn on your GPS and place it somewhere it can see the sky. I usually tie the GPS to my backpack when hiking or camelback when riding. Make sure it is receiving a good signal before you head out.
- While on your hike take pictures as you normally would. I would recommend taking a quick shot at the start before you head out (usually of the trail head) and a shot at the end before you head home. These are good to bracket your time on the trail.
- When you are done remember to turn off the GPS. This will automatically end the track. I like to do it right when we finish so there isn't any clean up that needs to be done with the data later.
- GPS - Garmin MapSource - This is the software that came with my GPS receiver. Any software that can save out to a .gpx file will do here.
- Select Receive From Device to upload the track information from the GPS.
- Choose the options to only import tracks from you GPS then hit receive. This will load all the tracks from the GPS unit into the computer.
- Pick the most recent track from the list of tracks. This will be your most recent trip. It is possible if you turned off and on your gps during the trip that you will want to select multiple tracks (this can also happen in wooded areas where a bad signal causes the track to stop then start recording again). Use the time stamps to let you know which is the correct track/s.
- Verify you have the correct track/s by right clicking the track and selecting Show Selected Track On Map. You can also do this from the View menu. This will show the track on the map and you can get an idea if this is the hike or bike you just completed.
- At this point I usually rename the track to the name of the place I just hiked or biked.
- Before you save it is good to look at the points in the track and make sure they all make sense. Often times if part of your trip was in an area where you had a bad GPS signal you can get points that are wildly incorrect. I usually just select these points and delete them. The number of data points in dense enough that this has little impact on the overall track.
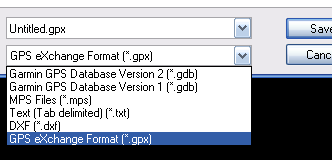
- Now save the file as a .gpx GPS eXchange Format file by going to File -> Save As... and selecting .gpx from the file type dropdown list.
- Digital Camera - Picasa - I use Picasa for all of my image transferring and organization. Picasa is a free software from Google http://picasa.google.com
- Use the import button to import from your digital camera directly through USB or use a memory card reader for your camera's memory.
- At this point if I only have photos from the previous hike or bike I just click the Import All button. If there are other photos I don't want to import I select all the photos I want and click the Import Selected button.
3. Process GPS and Image Data
- Geolocate Photos (Geotagging) - WWMX Location Stamper 2.0 - This is a free piece of software (PC only) that allows you to sync GPS track data and Digital Photos. http://wwmx.org/Download.aspx
- This application works by using the time data from the GPS track and syncing that with the time stamp from the digital images (this is why we sync our camera to the GPS).
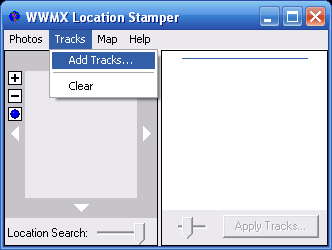
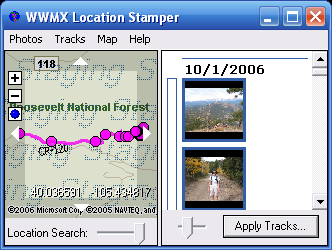
- Load the GPS track data - Tracks -> Add Tracks... Find the .gpx track data file you saved in step 2.
- Note: Make sure you load the track data before the photos. For some reason flipping the order results in Picasa not recognizing the GPS information in the images. (If you still are having problems see the comments by Markus about using exiftool.exe)
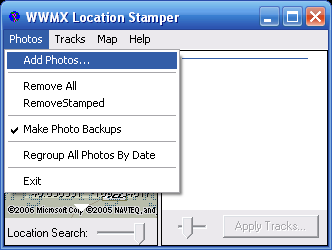
- Load the digital photos - Photos -> Add Photos... Select all of the photos that you imported with Picasa from your digital camera. By default Picasa puts these in My Documents\My Pictures\Your Folder Name.
- Click the Apply Tracks... button. At this point you can choose some options that specify how the data is handled. There is an option to backup all images into a backup folder and to not change images that are already geotagged. I have these both selected (default).
- At this point you should see dots on the map that indicate the location of each photo. If the dots appear to be off this is because the time stamp of the images and the GPS data are out of sync. It is possible to adjust the images time stamp to get the images to align correctly with the GPS track by selecting the photos and right clicking and selecting Adjust Timestamps.
- Modifying Digital Photos - Picasa
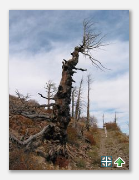
- This is the point where you should make any edits you want to the digital photos such as rotation, color adjustments, cropping, etc. This can all be done in picasa. Notice that all of the photos you have geolocated will have a small cross in the lower right hand corner of the thumbnail image in Picasa to indicate the GPS data.
- This is also a good time to add captions to your photos in Picasa. You can do this by double clicking a thumbnail in the library view and entering text at the bottom of the screen where it says Make a caption!
- Export photos to Google Earth from Picasa
- In the library view select all of the photos you want to export by control or shift clicking the thumbnails of the photos you want to select. You can also use the Hold button on the lower left by the Photo Tray. The Photo Tray will fill up with mini thumbnails of all the photos you select.
- Once you have all the photos selected go to Tools -> Geotag -> Export to Google Earth File.
- Create Google Earth Files
- If you don't have Google Earth then download it free at http://earth.google.com
- Open the .gpx track file in Google Earth by going to File -> Open then selecting the GPS item from the file types pulldown.
- Reformat the folders for the GPS track information. I usually rename the item called GPS device that has the Google Earth logo by it to the name of the trip. I then rename the folder called waypoints to Placemarks (this is where I will add placemarks next). I usually delete the folder called Routes as it is empty.
- Rename items so they have more meaningful information than the default "path" that gets created when loading a .gpx file.
- Add placemarks to the track in the placemark folder. I usually add placemarks at the parking area, trailhead, and summit. Sometimes there are other places that are nice to mark that have some significance. You can add a placemark by right clicking the placemark folder you created and select Add -> Placemark... Then move the placemark to the desired location, select an appropriate icon and name it.
- Move the camera to a nice view. I usually like to tilt the camera down so I can see the elevation gain of a hike or bike. When you have a nice view right click on the highest item in your folder hierarchy for this trip and select Snapshot View. This will set the view for that item.
- At this point I save this information as a KMZ file by selecting the item I renamed to the trip in the Places window and then going to File -> Save As... and naming my KMZ file to the name of the trip. This is not the final KMZ, but is a good light weight file that has the track and placemark information that is great for viewing in Google Maps.
- Now I open the KMZ file that has the photos that we exported from Picasa. Go to File -> Open and find the photos KMZ file.
- I now move the photos folder in the Places window under the top level trip item we just saved out to a KMZ by dragging the photos folder up to the appropriate place.
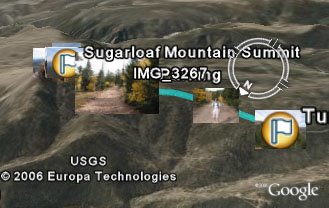
- You should now see thumbnails of the images that line up with the track from the GPS data. You can click on the thumbnail to get a bubble with a larger view of the image and any caption text you added in Picasa before you exported the images.
- Now I save the full KMZ file by selecting the top level trip item again and going to File -> Save As... and naming it with the same name as the trip, but his time with a "-Pictures.kmz" suffix on the file so I know this file has all of the information including pictures.
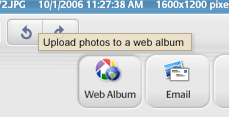
- Geolocated Photos - Using Picasa Web Albums (Public web gallery)
- Select all the photos you want to publish to the web to share with your friends and family.
- Click the Web Album button on the bottom of Picasa.
- Fill in the form to give some information about the album. You can specify the size that the pictures are to be uploaded. You can also specify if the album is public or private (not that private albums are not completely private so make sure you only post photos you are willing to share with the world).
- All of the thumbnails for the photos you have uploaded will now show a green up arrow to indicate you have uploaded them to Picasa Web Albums.
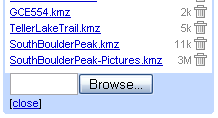
- Google Earth KMZ files
- I post these files on http://pages.google.com where you can get 100mb of free storage. Any other online hosting will work too, but Page Creator from Google is great because it is free. Use short easy names when uploading the KMZ files because we will use these in links when publishing the blog.
- I use Blogger as you can see to publish our blog. Blogger has a super easy web interface to post blogs. I use a template for all of my posts that has the basic structure of common parts of each post already written. This makes it easy to just fill in the blanks so you don't have to remember long urls for links or chunks of html for embedding items. This is the unmodified template that I use:
Elevation Gain - XXX ft
Difficulty - Easy Moderate Hard Crazy Hard
Time - X:XX
Description - Enter description
Photos - Picasa Web Album
http://briangbrown.googlepages.com/album_background_black.gif
- In Picasa Web Album, if you go to an album you have posted there is a link on the left called Embed in Blog/MySpace which gives you a snippet of html to copy into your blog to show a thumbnail of your album cover with a link to the album. This is a quick easy way to make a nice looking link to your album from your blog. (If you have a non-white background for your blog like mine you might have to edit the html a bit to make it look nice)
- I add links to Google Maps to display the light weight KMZ file without having to download the file and open it in Google Earth. The link looks like this http://maps.google.com/?q=http://briangbrown.googlepages.com/SouthBoulderPeak.kmz&t=h The query to Google Maps is the url of the light weight KMZ you posted. The &t=h added onto the end just makes the map show in hybrid mode. You can remove this to make it show in standard mode by default or change it to &t=k to show in satellite mode.
- To add a link to a KMZ file that you want displayed in Google Earth is simple. Just add a link directly to the KMZ url like this http://briangbrown.googlepages.com/SouthBoulderPeak.kmz This will download the KMZ file to the user's computer and automatically open in Google Earth if they have already downloaded Google Earth.
- Once you are done with all of that then just POST!
- (UPDATE 11-05-06) I now add links to Google Maps of the full kmz with photos. Google Maps now has the ability to crack open the KMZ and display your embedded photos which is sweet. Check out an example like this http://maps.google.com/?q=http://briangbrown.googlepages.com/MalloryCave-Pictures.kmz&t=h
Comments
Great comments on how to do all of that.
Kudos on the excellent geotagging tutorial!
I'm helping develop a site called TripTracker, which was designed to automate the whole geotagging process and make sharing tracks and photos online easier (unlike Google Earth, it has a web interface). Please feel free to check it out!
Cheers, Andrej
That point about Garmin's "save track log" feature is also valid - not only are the timestamps removed (which is bad), but lots of points are deleted (which is very very bad) - in short, don't use the save track log feature on Garmin units.
qiute nice explanation. When i saw it i became most interested in the process.
I´m getting some problems.
The major one is that the Location Stamper won't write the geolocating at the gpeg files. It writes copyright information, but not the coordinates os the photo.
Did you experienced such troubles.
It is not working. Could you please help me?
Thanks!
I recently set out to make it as simple as possible, and make sharing such maps easy with others.
While it's in beta, and much more is to come, I'd be delighted if some of you checked out my site, OurGlobes. You can embed you flickr photos and movies anywhere on your personal map with a couple buttons- demo vid is on the homepage :)
even if you don't like the site, let me know what you think about it- i'm entranced by geotagging, you have excellent ideas. i hope to add group maps and embedding for other sites very very soon (really, it's become an obsession of mine to serve the geotagging community)
http://www.ourglobes.com/
take care,
kyle
WWMX 2.0 and Picasa2 (2.6.0) don't seem to play well together. Despite the fact that WWMX does tag the Lat/Lon info in the EXIF header, Picasa does not recognize it. I have read of others with the same problem, none of whom have found a solution (other than Robogeo). How do you get around this problem?
Thanks,
Pat
I had a problem with one of my posts on 1/28/07 and have not actually tried since then. I'm not sure if it was a change in Picasa or what. I am going to have to investigate further.
Brian
locr offers the ideal solution and makes geotagging exceptionally easy. locr uses GoogleMaps with detailed maps and high-resolution satellite images. To geotag your photos just enter address, let locr search, fine-tune the marker, accept position, and done! If you don't know the exact address simply use drag&drop to set the position.
For automatic geotagging you need a datalog GPS receiver in additon to your digital camera. The GPS receiver data and the digital camera data is then automatically linked together by the locr software. All information will be written into the EXIF header.
Use the "Show in Google Earth" button to view your photos in Google Earth.
With locr you can upload photos with GPS information in them without any further settings. In the standard view, locr shows the photo itself, plus the place it was taken. If you want to know more about the place where the photo was taken, just have at look at the Wikipedia articles which are also automatically assigned to the picture.
Have a look at www.locr.com.
thanks for this great tutorial!
It actually seems that the current Picasa is a bit more sensitive regarding the version number of the GPS exif data. I searched a bit and found a tool to batch-convert the version number after GPS-stamping the images:
Exiftool
http://www.sno.phy.queensu.ca/~phil/exiftool/
I downloaded the .exe file, renamed it to exiftool.exe and placed it somewhere in the PATH.
Once in the folder with the images I just started
exiftool -GPSVersionID=0.0.2.2 -overwrite_original *.jpg
After that, Picasa found the location data in the images.
Markus
Nice tutorial!
All the best I know how much time and hard work you have put into this project.
Any idea how to put all that into a shortcut so one doesn't have to type that into a command-line each time?
Ian (www.ianandwendy.com)
Could you help me pls? I'm having trouble embedding my picasa web album onto my blog. I don't know which part of the blog i should paste the html snippet onto.
Thanks!
If you are using blogger then you just use the edit html tab when creating a new post. You can put the html snippet anywhere in there.
Myspace Proxy
Find the article here:
http://newsofthefuture.net/index.php?/archives/21-GPS-Tagging-of-Photos-Evaluation-of-Flickr,-Picasa-and-Panoramio.html
https://ecommerce.redhensystems.com/pc-47-2-blue2can.aspx
I found this site http://www.trekinu.com much easy to share my albums.
Trekinu is very neat and easy to use tools I like the idea and in 5 simple steps you have something to send to your friends or share in your site.
You can check this trek for example: http://www.trekinu.com/viewtrek.aspx?trkid=8h5b5glzsxa1h43
We've been geoblogging in Blogger about our five year sailing trip around the world. I've been developing some utilities that allow you to share your geotagged Picasa Albums directly in Blogger and geotag the post location. Then you can create an interactive blog navigation map to plot/navigate and preview your blog posts.
Here's your Picasa Albums.
I'd love some feedback if you get a chance.
http://notions.okuda.ca/geotagging/downloading-the-wwmx-tools/
Cheers
Rex